Sunday 24 October 2010
Wednesday 20 October 2010

Prelim Task: Post Production
After filming the footage for our prelim task, it was time to edit it using Final Cut Pro. All the footage is stored in a file sever in a central computer in the editing suite which each group could access using their own respective computer. We checked in Final Cut Server to obtain our footage and we checked out once we were done editing our work. All this footage was stored in a folder called the Rushes Bin. We then had to skim through all the footage and choose the clips that we thought were useful. We chose the clips where the dialogues were clear, the actors were well seen and the lighting and angles were flattering. We also thought about how these clips could be juxtaposed with others in order to clearly narrate the story.thinking when we These clips were then dragged to the Log Bin in Final Cut Pro. The clips that we definitely wanted the video to contain were dragged into the timeline (we followed the storyboard…), which where you can actually edit them – cut and join them to other clips. After we were done editing for the day, we would check out our saved work back to the file server.
When editing, we had to make sure the joined clips were seamless, making sure there was continuity editing throughout the video. To achieve this, we used the arrows on the keyboard to choose the exact point at which one clip matches is the other. For example, the door’s position in the establishing shot had to be in the exact same position in the wide shot which was immediately after it. It had to be precise. I discovered that even a single frame forward or behind can make all the difference.
In addition to that, we had to make sure that the story was clear and that the film language could be easily interpreted. This was achieved by organising the shots in a specific order. Also, we had to make sure the prop we used (the keys) was juxtaposed correctly so that the story could be correctly understood. The right shot of the right person in the right angle with the appropriate camera movement had to be placed in the right place in order for the sequence to make sense in terms of film language. We initially had to experiment juxtaposing different angled shots with each other in so we could see which combination looked the best. We then added that to our sequence.
We had a choice of either following the storyboard provided to us, or we could reconstruct the sequence as long as it followed the basic structure of the story. We chose to opt for a combination of both. At times, the story made best sense when the clips were edited according to the storyboard however we sometimes felt that by adding a specific clip that wasn't in the storyboard, for example the close up of the keys, made a large difference in the effect the audience would have when viewing it. It added a sense of mystery to the general theme of the sequence. In addition to that, when choosing the shots and editing them, we had to make sure it followed continuity editing. The different angled clips when juxtaposed together had to be coherant and seamless in order for the narration to be explicit.
We had a choice of either following the storyboard provided to us, or we could reconstruct the sequence as long as it followed the basic structure of the story. We chose to opt for a combination of both. At times, the story made best sense when the clips were edited according to the storyboard however we sometimes felt that by adding a specific clip that wasn't in the storyboard, for example the close up of the keys, made a large difference in the effect the audience would have when viewing it. It added a sense of mystery to the general theme of the sequence. In addition to that, when choosing the shots and editing them, we had to make sure it followed continuity editing. The different angled clips when juxtaposed together had to be coherant and seamless in order for the narration to be explicit.
Wednesday 13 October 2010
Preliminary Task Evaluation
We shot our Prelim Task in one of the classrooms in the Media block which is a simple rectangular shaped room. It worked well in terms of lighting and sound since we didn’t have any external light or noises present in the background – we had complete control over the lighting and sound and therefore no difficulties regarding these issues. The classroom was completely silent which made it convenient for the sound to record appropriately and we could use blondes (lights) to light the classroom in a way that added to the mood of the scene and the depth of the characters. Also, being in the classroom allowed us to use the furniture like the desks and chairs as props in our shoot. On the other hand, it did get slightly challenging to shoot in certain angles since the amount of space was limited which forced us to find alternative areas/angles to shoot from.
We all took chances at performing the different tasks involved when shooting this task. There was a director, camera operator, continuity supervisor (paying attention to continuity details) and a storyboard person (who kept track of what shot we were shooting and which shots we already filmed). We kept alternating with these positions which gave all of us a fair chance of experiencing the shoot.
The director’s job was to:
1) Compose the frame: Position the characters and coordinate the setting with the camera operator
2) Give directions to the crew: stand by, camera rolling, lead in, action, lead out, cut
3) Monitor the performance of the actors while the camera was rolling
The camera operator’s task was to handle the camera in the following ways:
1) Make sure the camera is bubbled (in level with the tripod)
2) Make sure the camera is white balanced
3) Make sure the camera is focussing on the subject
4) Work with the director in composing the frame (rule of thirds)
5) Responding to the directors instructions: standing by, camera rolling
The continuity supervisor’s main task was to examine continuity details so that we wouldn’t face any difficulties due to this while editing. This required paying close attention to any movement made by the actor or any movement on the set and make sure it is maintained throughout the shoot.
The storyboard person was meant to keep track of what shot we were shooting at that time and what footage was already recorded (according to the storyboard). This helped us as a group to stick to our time limit and not waste time figuring out what we had already shot and what we hadn’t.
We also made a checklist of things that we needed to keep in mind before recording the scene. It consisted of important rules and details such as bubbling the camera, 180 degree rule, focussing, zooming, etc. One of us would read out this checklist before recording so that we wouldn't forget anything that would lead us to re-shooting the scene. This was an extremely helpful method which also enabled us to avoid wasting time.
We also made a checklist of things that we needed to keep in mind before recording the scene. It consisted of important rules and details such as bubbling the camera, 180 degree rule, focussing, zooming, etc. One of us would read out this checklist before recording so that we wouldn't forget anything that would lead us to re-shooting the scene. This was an extremely helpful method which also enabled us to avoid wasting time.
This method of dividing the tasks helped us work well as a team and allowed us to successfully shoot our task.
From all the various positions I played, I most enjoyed being the director and camera person as it involved being able to construct the frames allowing us to pitch in our creativity and think outside the box.
Lighting
For our shoot, we used a rather dark light (blondes) with hard edges creating an interesting shadowy effect. This was important to the scene as it helped enhance the intensity of the characters' roles and made it visually pleasing. I definitely think this was an effective method of lighting since it added depth not only to the characters, but also to the scene as a whole. It also gave it a sense of texture.
Filming
To avoid making mistakes like those we made in the dry run, we heavily relied on our checklist which consisted of all the elements we had to look out for. We begun by setting up the camera & tripod and the storyboard person would refer to the given storyboards and tell the rest of the crew what shot we had to shoot, followed by sharing ideas about the possible angles we could try shooting from. After deciding that, we placed the camera in the desired place and angle we had to shoot it from, making sure we didn't cross the 180 degree line. Next, we did the bubbling process in order to make sure that the camera was in level with the tripod. We then begun constructing the frame (placing the actors in position, discussing how the shot will take place, positioning the props, making sure the lighting equipment was not in the frame, etc.), keeping the rule of thirds in mind. Next, we adjusted the white balance (by pressing the WHT BAL button on the camera when it was facing a white background), focussing (zooming right into the subject, focussing on it by turning the focus ring and then zooming out) and exposure. We did face a lot of difficulties with the exposure since the room was small in size and the lights would reflect causing overexposed areas. It was challenging to find that prefect balance between exposing the right amount of light so as to avoid exposure, and maintaining the shadow/silhouette which gave the shot scene an intense feel. We finally had to compromise by leaving certain areas of the frame over exposed which hopefully can be corrected by colour grading in post production. Once everything was in order, the director would give instructions to the rest of crew using professional terminology (roll camera, lead in, action, etc.) which we all understood and responded to.
This prelim task has been a wonderful experience as it gave me a chance to learn a lot about the world of practical filmmaking with a hands-on approach. I have learned how to set up a camera (fix it on a tripod, bubble it, adjust white balance, focussing and exposure), compose a frame, edit footage, work with a team and use professional terminology while on set. Acquiring all these skills has broadened my idea of practical filmmaking, driving me to develop them as when I get the chance. I very much look forward to the next task when I get to apply these skills.


Sunday 10 October 2010
4) Storyboarding
Storyboards are series of drawings that visually illustrate the sequence of shots and events in a film.
They contain details such as the shot/frame composition, edit transitions, what characters are in the frame, what dialogues are present, the camera angle and movement, and any other details that you can incorporate.They help plan your film, shot by shot and changes can be easily changed.

This is an example of a storyboard.
Wednesday 6 October 2010
Introduction to Video Camera
Camera Operation and Functions
Timecode:
The timecode symbol is located on the top right corner of the video camera screen. It is denoted in the format of hours:minutes:seconds: frames (a second is composed of 25 frames which is why this component of the timecode only goes up to 24)
White Balancing:
The camera cannot identify colours until it is familiar with the colour white. In order to do a white balance on the camera, you must show the camera a white object under the light that you will be filming it in. You must then press the 'WHT balance' button on the left side of the camera and adjust it to the right shade of white. If you choose to do this manually, you must do a white balance everytime you change your light source. By doing so, you ensure that colours are produced accurately.
Aperture Settings:
An aperture is the hole in the camera lens that allows light to enter the camera. It is expressed as F-Stop: the smaller the F-Stop, the larger the lens opening, the more light is let through and vice versa.
Focussing:
Focussing is the adjustment of the lens so that the image you are video taping is sharp and clear in your view finder or on your monitor. The ideal way to focus on an object is to zoom right into it, adjust the focussing until the object is perfectly clear (using the focus ring) and then zoom right out of it.
Tripod:
A tripod is a vital tool used in filmmaking. It is a three-legged object used to support a camera. It has adjustable height and the camera can be placed on it in various ways allowing you to film in different angles.
Bubbling the tripod:
Bubbling is the process allowing the camera to be in level with the tripod. It can be achieved by adjusting the lever under the tripod, making sure the bubble (at the front of the tripod) is in the center od the circle drawn.
Using the Camera:
Camera Shot Types:
Extreme Wide Shot (EWS): A wide frame in which subjects in the frame are small; a building, cityscape. This is often used as an establishing shot.
Very Wide Shot (VWS): The subject is barely visible. The emphasis is on placing the subject in the environment.
Wide Shot (WS): The subject takes up the full frame, or at least as much as possible. The same as a long shot.
Mid Shot (MS): Shows some part of the subject in more detail whilst still giving an impression of the whole subject.
Medium Close Up (MCU): Half way between a MS and a CU.
Close Up (CU): A certain feature or part of the subject takes up the whole frame.
Extreme Close Up (ECU): The ECU gets right in and shows extreme detail.
Cut Away (CA): A shot of something other than the current action.
Cut-In: Shows some part of the subject in detail.
Two-Shot: A comfortable shot of two people, framed similarly to a mid shot.
Over-The-Shoulder-Shot: Looking from behind a person at the subject.
Noddy Shot: Usually refers to a shot of the interviewer listening and reacting to the subject, although noddies can be used in drama and other situations.
Point-Of-View Shot (POV): Shows a view from the subject's perspective.
Weather Shot: The subject is the weather, usually the sky. Can be used for other purposes.
Here's a video summarising all the above:
Rule of Thirds:
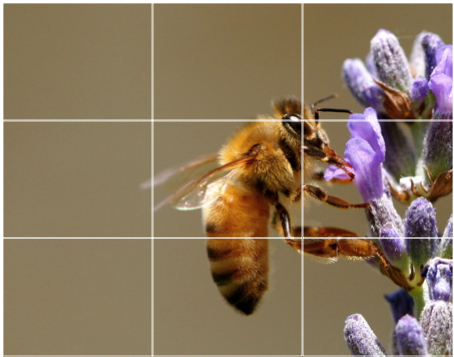
The picture above is very well constructed in terms of rule of thirds. The wasp's eye is right at the intersection of the lines, catching our attention. It also gives us enough head space and looking space to absorb the image.
Continuity Editing:
Continuity editing refers to arranging the sequence of shots to suggest a progression of events. Its purpose is to smooth over the inherent discontinuity of the editing process and to establish a logical coherence between shots.
180 Degree Rule:
The 180° rule is a basic guideline in film making that states that two characters (or other elements) in the same scene should always have the same left/right relationship to each other. If the camera passes over the imaginary axis connecting the two subjects, it is called crossing the line. The new shot, from the opposite side, is known as a reverse angle.
Useful Video:
I made a lot of mistakes in the practice shoot, especially in terms of the 180 degree rule and focussing (I did not keep them in mind).
However, I corrected the mistakes in the real shoot by creating a checklist with the things I had to keep in mind before pressing the record button.
Industry Terminology:
Timecode:
The timecode symbol is located on the top right corner of the video camera screen. It is denoted in the format of hours:minutes:seconds: frames (a second is composed of 25 frames which is why this component of the timecode only goes up to 24)
White Balancing:
The camera cannot identify colours until it is familiar with the colour white. In order to do a white balance on the camera, you must show the camera a white object under the light that you will be filming it in. You must then press the 'WHT balance' button on the left side of the camera and adjust it to the right shade of white. If you choose to do this manually, you must do a white balance everytime you change your light source. By doing so, you ensure that colours are produced accurately.
Aperture Settings:
An aperture is the hole in the camera lens that allows light to enter the camera. It is expressed as F-Stop: the smaller the F-Stop, the larger the lens opening, the more light is let through and vice versa.
Focussing:
Focussing is the adjustment of the lens so that the image you are video taping is sharp and clear in your view finder or on your monitor. The ideal way to focus on an object is to zoom right into it, adjust the focussing until the object is perfectly clear (using the focus ring) and then zoom right out of it.
Tripod:
A tripod is a vital tool used in filmmaking. It is a three-legged object used to support a camera. It has adjustable height and the camera can be placed on it in various ways allowing you to film in different angles.
Bubbling the tripod:
Bubbling is the process allowing the camera to be in level with the tripod. It can be achieved by adjusting the lever under the tripod, making sure the bubble (at the front of the tripod) is in the center od the circle drawn.
Using the Camera:
Camera Shot Types:
Extreme Wide Shot (EWS): A wide frame in which subjects in the frame are small; a building, cityscape. This is often used as an establishing shot.
Very Wide Shot (VWS): The subject is barely visible. The emphasis is on placing the subject in the environment.
Wide Shot (WS): The subject takes up the full frame, or at least as much as possible. The same as a long shot.
Mid Shot (MS): Shows some part of the subject in more detail whilst still giving an impression of the whole subject.
Medium Close Up (MCU): Half way between a MS and a CU.
Close Up (CU): A certain feature or part of the subject takes up the whole frame.
Extreme Close Up (ECU): The ECU gets right in and shows extreme detail.
Cut Away (CA): A shot of something other than the current action.
Cut-In: Shows some part of the subject in detail.
Two-Shot: A comfortable shot of two people, framed similarly to a mid shot.
Over-The-Shoulder-Shot: Looking from behind a person at the subject.
Noddy Shot: Usually refers to a shot of the interviewer listening and reacting to the subject, although noddies can be used in drama and other situations.
Point-Of-View Shot (POV): Shows a view from the subject's perspective.
Weather Shot: The subject is the weather, usually the sky. Can be used for other purposes.
Here's a video summarising all the above:
Rule of Thirds:


The picture above is very well constructed in terms of rule of thirds. The wasp's eye is right at the intersection of the lines, catching our attention. It also gives us enough head space and looking space to absorb the image.
Continuity Editing:
Continuity editing refers to arranging the sequence of shots to suggest a progression of events. Its purpose is to smooth over the inherent discontinuity of the editing process and to establish a logical coherence between shots.
180 Degree Rule:
The 180° rule is a basic guideline in film making that states that two characters (or other elements) in the same scene should always have the same left/right relationship to each other. If the camera passes over the imaginary axis connecting the two subjects, it is called crossing the line. The new shot, from the opposite side, is known as a reverse angle.
Useful Video:
I made a lot of mistakes in the practice shoot, especially in terms of the 180 degree rule and focussing (I did not keep them in mind).
However, I corrected the mistakes in the real shoot by creating a checklist with the things I had to keep in mind before pressing the record button.
Industry Terminology:
STAND BY / STANDING BY - readys everyone into position for the take. The AD calls STAND BY and the response tells them that everyone is prepped
TURN OVER / TURNING OVER (Roll film/Rolling etc) The director tells the camera operator to start filming - a few seconds of film is then run as the camera gets up to speed - this is often referred to as LEAD IN. Once done the Camera operator will respond TURNING OVER or ROLLING (etc) to indicate being up to speed
ACTION! - Cue for the actors to perform the take, and the crew to do their jobs. It is good practice for the Director to let the film run on a further few seconds after the take is completed before cutting - this is referred to as LEAD OUT
CUT! - Cue for the camera to stop running film. Industry practice expects that the camera operator does not CUT before being told
My Video Camera Experience:
Moving from a still camera to a video camera unleashed a whole new world for me which I can get more creative with. I really enjoyed the whole experience and I look forward to shooting more footage!
Subscribe to:
Posts (Atom)